How to use JWT token from query string
Normally you authenticate via a HTTP header when you are accessing an API. But how do you configure your server to allow authenticating via the query string too?
The problem
Authenticating via a HTTP header is in many cases a better option. But in some scenarios, authentication via the query string, is preferable. For instance, if you are creating an API that should be used via Excel and you do not want to store the credentials in the file.
If you are having a ASP.NET Core service that supports JWT you probably have this configured something like this:
services.AddAuthentication(JwtBearerDefaults.AuthenticationScheme)
    .AddJwtBearer(options =>
        {
            options.TokenValidationParameters = new TokenValidationParameters
            {
                // Configuration code
            };
        });
This enables JWT authentication via HTTP. But there is no built-in support for authentication via query string.
The solution
Luckily, it is not too hard to manually enable query string authentication.
You could use the Events property to hook up some code you want to execute
when request is processed. It should look something like this:
services.AddAuthentication(JwtBearerDefaults.AuthenticationScheme)
    .AddJwtBearer(options =>
        {
            options.TokenValidationParameters = new TokenValidationParameters
            {
                // Configuration code
            };

            options.Events = new JwtBearerEvents
            {
                OnMessageReceived = (context) => {
                    if (!context.Request.Query.TryGetValue("access_token", out StringValues values))
                    {
                        return Task.CompletedTask;
                    }

                    if (values.Count > 1)
                    {
                        context.Response.StatusCode = (int)HttpStatusCode.Unauthorized;
                        context.Fail(
                            "Only one 'access_token' query string parameter can be defined. " +
                            $"However, {values.Count} were included in the request."
                        );

                        return Task.CompletedTask;
                    }

                    var token = values.Single();

                    if (string.IsNullOrWhiteSpace(token))
                    {
                        context.Response.StatusCode = (int)HttpStatusCode.Unauthorized;
                        context.Fail(
                            "The 'access_token' query string parameter was defined, " +
                            "but a value to represent the token was not included."
                        );

                        return Task.CompletedTask;
                    }

                    context.Token = token;

                    return Task.CompletedTask;
                }
            };
        });
With this you could then the authentication string in the query string with the parameter
name access_token. So, if you previously authenticated this URL:
https://rsptournament/api/players
With this in the HTTP header:
Authorization: Bearer abc123
You now could use this this URL:
https://rsptournament/api/players?access_token=abc123
Note that Bearer should not be in the query string. I admit that I did not
figured out this myself but found the solution in this
Stack Overflow thread.
How to use this with Power Query
If the API service is supporting authentication via query string you could use this in Power Query. It is a bit tricky to setup so here is a short tutorial:
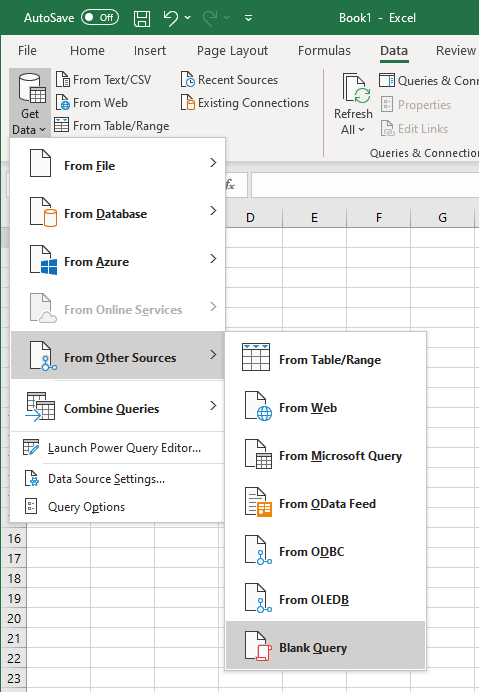
In Excel, select Data > Get Data > From Other Sources > Blank query:

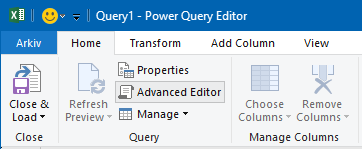
Next in the Power Query editor, select Home > Advanced editor:

Next, you replaced the query with this:
let
    Source = Json.Document(Web.Contents("https://rsptournament/api/players", [ApiKeyName="access_token"]))
in
    Source
Note that the ApiKeyName is set to access_token in the query. This specifies
the name used in the query string. Close the editor and now you will be asked
for credentials.
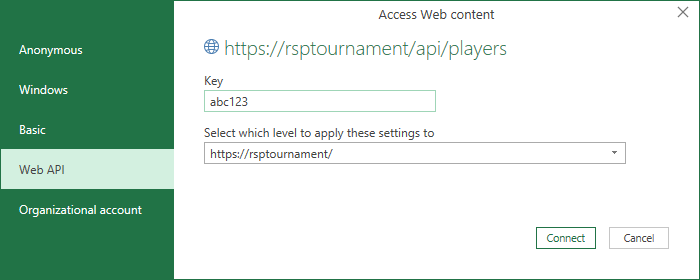
Select Web API and enter the key (without “Bearer”) like this:

That should be it. After this you should see the data in the Power Query editor.
Now then Power Query is accessing the API the API key will be read from a local storage, not the Excel file, and be added automatically to the query string.
Summary
As I explained in the previous post, it is possible to Using Power Query and web API with HTTP authentication. But this requires that the authentication string is stored in the Excel file. The method explained above let you avoid that but will make the authentication string to be send in the query string instead.